> ## Documentation Index
> Fetch the complete documentation index at: https://docs.unoverse.ai/llms.txt
> Use this file to discover all available pages before exploring further.
# Studio
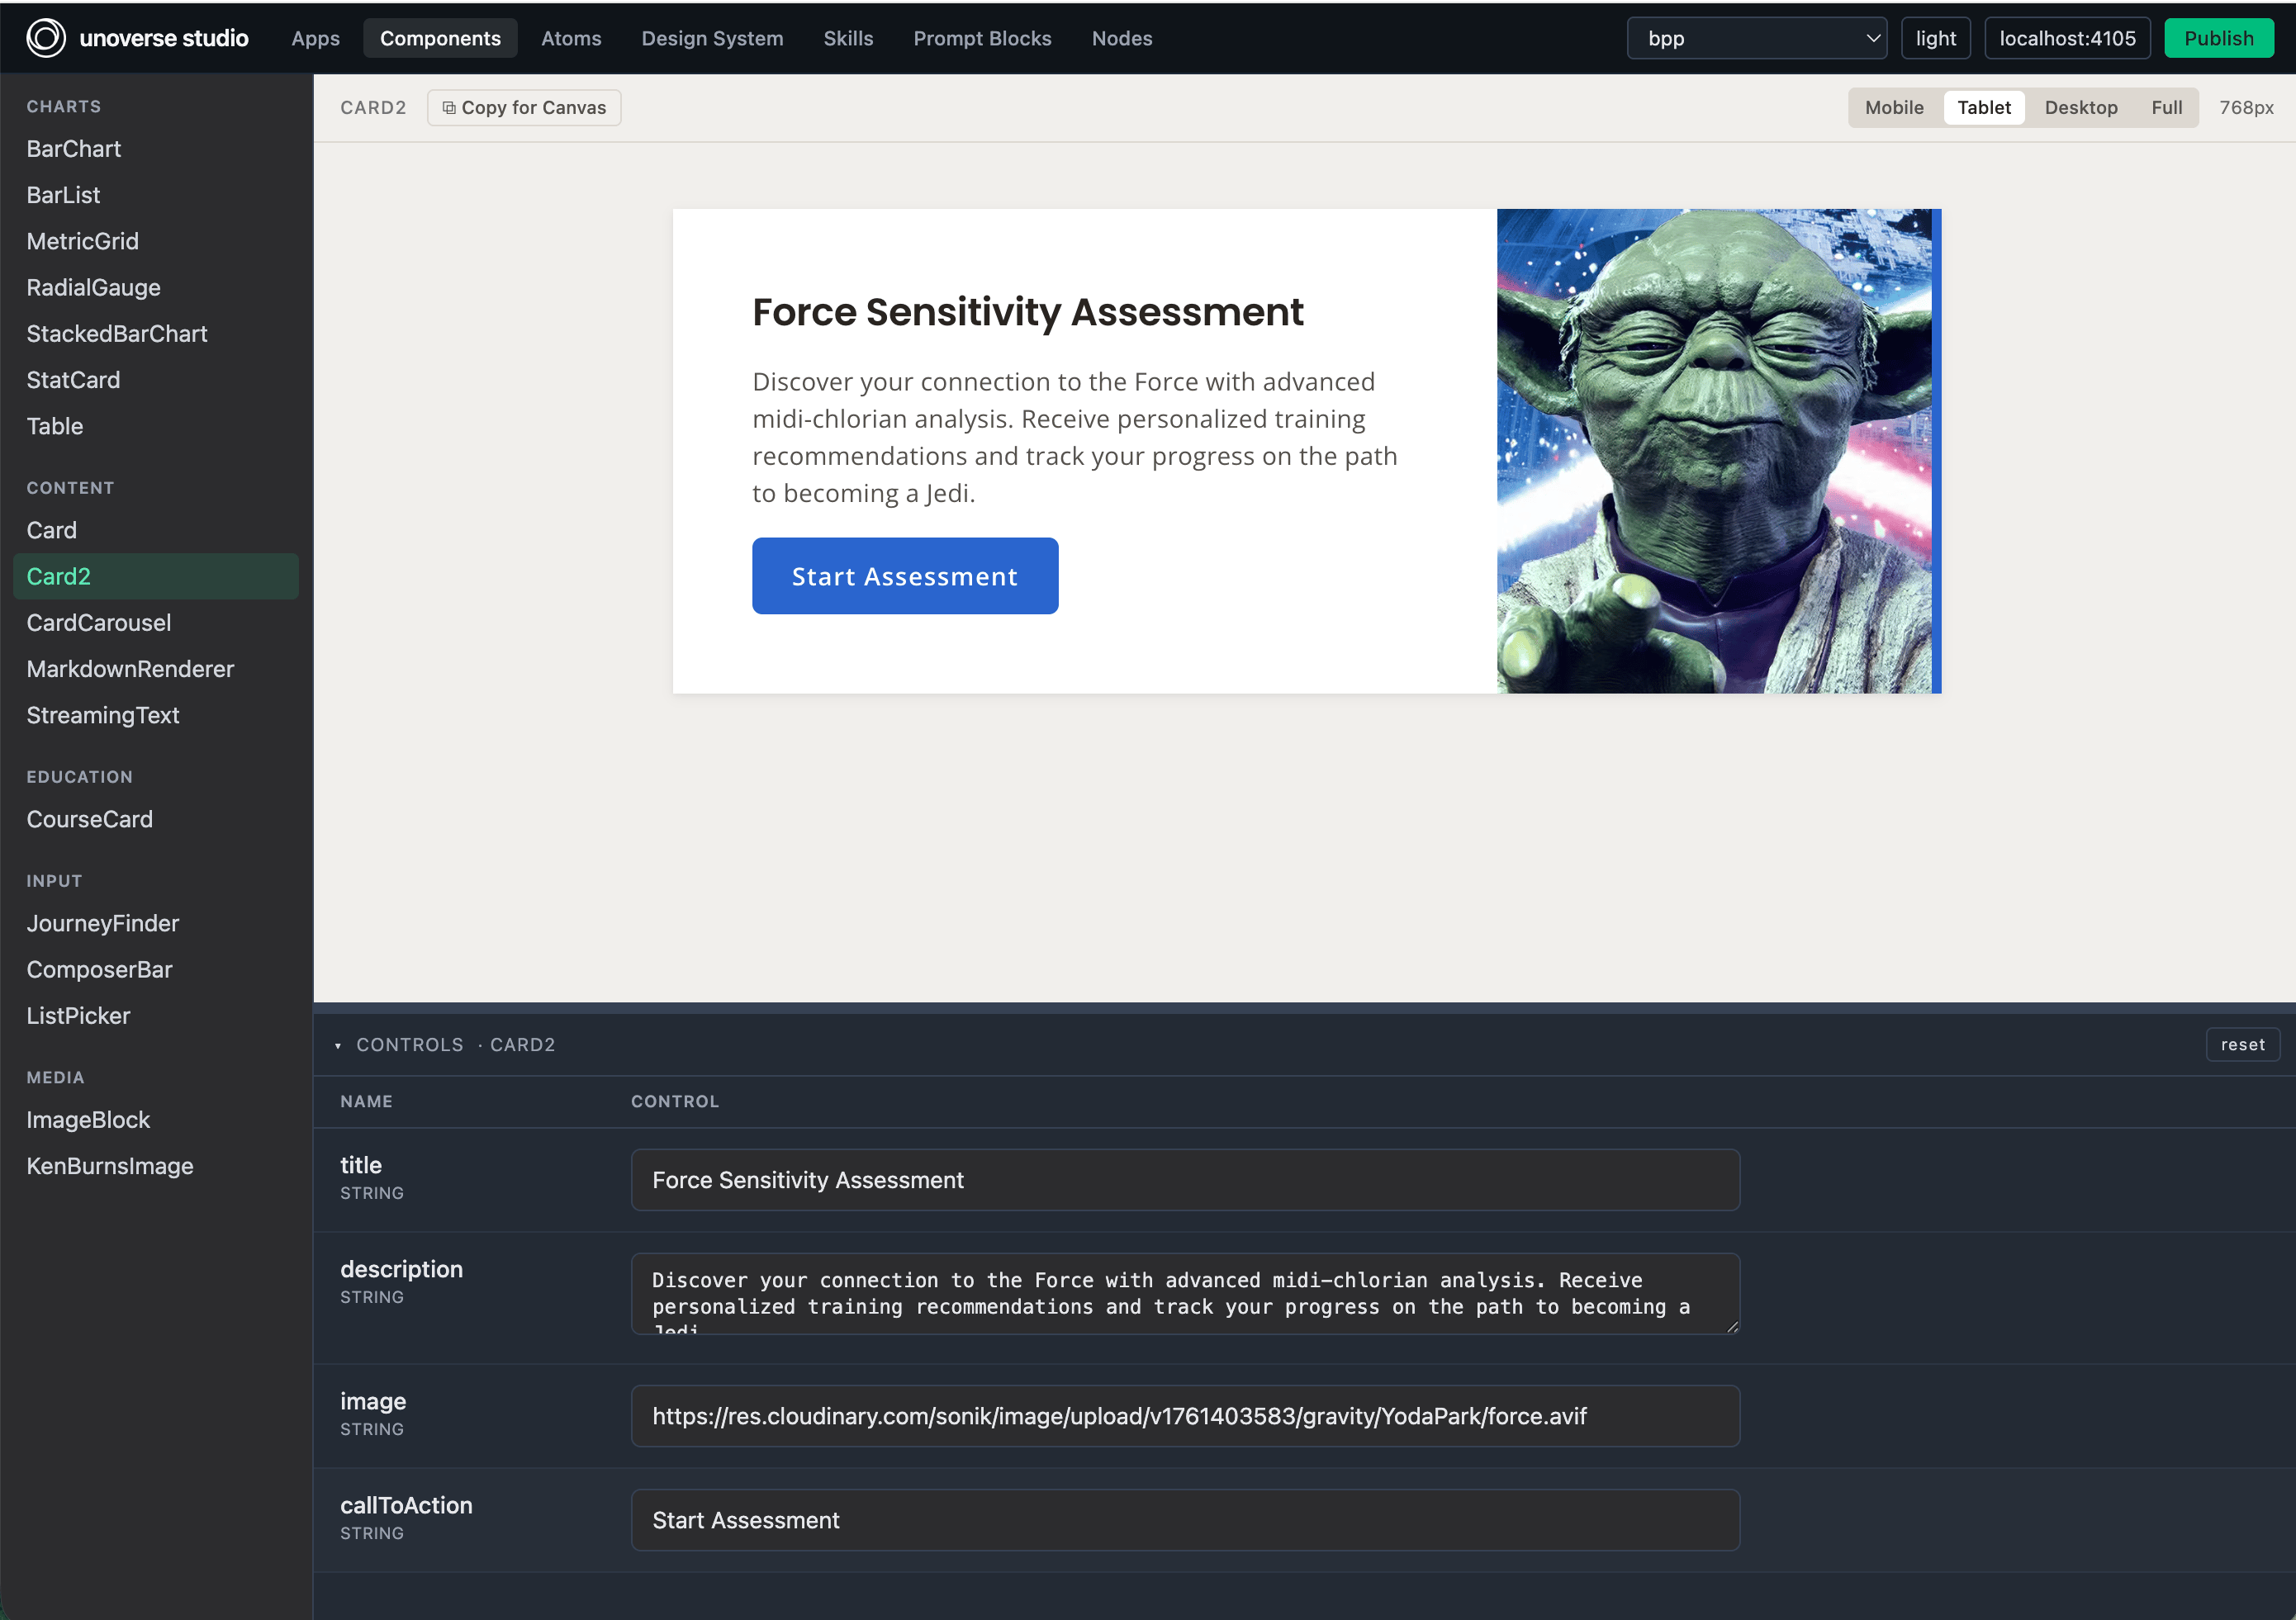
**Studio** is where you build everything an Agent uses: interfaces, nodes, skills and the
design system behind them.
It runs on your machine, reads your files straight off disk, and needs Node and nothing
else. No database, no Docker, no account, and it works offline.
 | | |
| ------------------------ | ------------------------------------------ |
| **What you need** | Node 20+ |
| **What you get** | The workbench for every asset you author |
| **Where your work goes** | Published to a universe when you are ready |
## Start it
Studio is a tool, not a project. Install it, run it where you want your project, and it
sets everything up for you.
```bash Install the unoverse CLI theme={"system"}
npm install -g unoverse
```
One small package, and it gives you the `unoverse` command:
| Command | What it does |
| ----------------- | ------------------------------------------------------------------------- |
| `unoverse create` | Asks what you are building: a Studio project, a universe, or a client app |
| `unoverse studio` | Launches Studio, downloading it on first run |
Open source and free. No account, and nothing else to install.
```bash Start a project theme={"system"}
unoverse studio
```
Run it in the folder where you want your project to live. The first time, it asks what to
call your project and creates the folders right there:
```
No project here yet.
/Users/you/my-folder
Name your project [my-project]:
```
You get `rx//` with `components`, `templates` and `styles`, plus `prompts/`
and `nodes/`, and a first component so Studio opens on something real rather than an empty
list.
| Folder | Holds |
| ---------- | ---------------------------------------------- |
| `rx/` | Your interfaces: components, templates, styles |
| `prompts/` | Agent skills and prompt blocks |
| `nodes/` | Your own integrations |
Studio opens on **[http://localhost:4108](http://localhost:4108)**. Open `rx//components/welcome/welcome.yaml`,
change the text, and save. Studio updates as you save.
Two equivalent routes, if you prefer them: `npm create unoverse@latest` runs the same
wizard with nothing installed, and `npm install -g @unoverse-platform/studio` installs
Studio itself, as the `unoverse-studio` command.
Run it again inside an existing project and it skips all that and opens straight away. It
finds your project by looking for `rx/` in the current folder or any parent, so it works from
anywhere inside it, and it will not offer to make a second project inside one you already
have.
## What you build here
| Tab | What it holds |
| ----------------- | ---------------------------------------------- |
| **Apps** | The surfaces an Agent speaks through |
| **Components** | The interface pieces, as data rather than code |
| **Atoms** | The shared pieces components are built from |
| **Design System** | Tokens: colour, type, spacing |
| **Skills** | Behaviour an Agent follows |
| **Prompt Blocks** | Reusable prompt fragments |
| **Nodes** | Your own integrations, and a place to run them |
Everything is a file in your repository. Studio renders what is there, and saving a file
updates what you see.
## Check your work
Studio validates as you go, and it will not let a broken definition be published.
## Run a node for real
The **Nodes** tab runs a node against the real service, with no platform running. Fill in
the settings, press **Run**, and the output appears beside them.
Keys come from your own `.env` and are stored nowhere.
[Testing Nodes](/nodes/testing-nodes) covers it.
## Publish to a universe
Everything up to here is offline. No account, no network, no universe. Connecting is the
one place Studio asks you for anything.
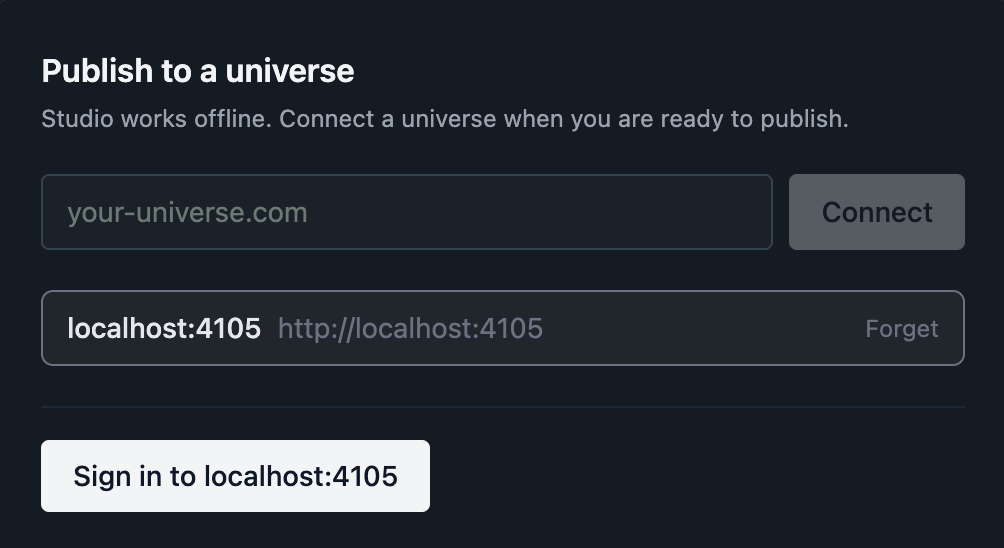
**Connect.** Type the address of the universe you are publishing to. Studio asks that
universe who authenticates it and signs you in against whatever the answer is, so it names
no provider and assumes nothing about how your organisation logs in.
You can keep more than one, and switch between them.
| | |
| ------------------------ | ------------------------------------------ |
| **What you need** | Node 20+ |
| **What you get** | The workbench for every asset you author |
| **Where your work goes** | Published to a universe when you are ready |
## Start it
Studio is a tool, not a project. Install it, run it where you want your project, and it
sets everything up for you.
```bash Install the unoverse CLI theme={"system"}
npm install -g unoverse
```
One small package, and it gives you the `unoverse` command:
| Command | What it does |
| ----------------- | ------------------------------------------------------------------------- |
| `unoverse create` | Asks what you are building: a Studio project, a universe, or a client app |
| `unoverse studio` | Launches Studio, downloading it on first run |
Open source and free. No account, and nothing else to install.
```bash Start a project theme={"system"}
unoverse studio
```
Run it in the folder where you want your project to live. The first time, it asks what to
call your project and creates the folders right there:
```
No project here yet.
/Users/you/my-folder
Name your project [my-project]:
```
You get `rx//` with `components`, `templates` and `styles`, plus `prompts/`
and `nodes/`, and a first component so Studio opens on something real rather than an empty
list.
| Folder | Holds |
| ---------- | ---------------------------------------------- |
| `rx/` | Your interfaces: components, templates, styles |
| `prompts/` | Agent skills and prompt blocks |
| `nodes/` | Your own integrations |
Studio opens on **[http://localhost:4108](http://localhost:4108)**. Open `rx//components/welcome/welcome.yaml`,
change the text, and save. Studio updates as you save.
Two equivalent routes, if you prefer them: `npm create unoverse@latest` runs the same
wizard with nothing installed, and `npm install -g @unoverse-platform/studio` installs
Studio itself, as the `unoverse-studio` command.
Run it again inside an existing project and it skips all that and opens straight away. It
finds your project by looking for `rx/` in the current folder or any parent, so it works from
anywhere inside it, and it will not offer to make a second project inside one you already
have.
## What you build here
| Tab | What it holds |
| ----------------- | ---------------------------------------------- |
| **Apps** | The surfaces an Agent speaks through |
| **Components** | The interface pieces, as data rather than code |
| **Atoms** | The shared pieces components are built from |
| **Design System** | Tokens: colour, type, spacing |
| **Skills** | Behaviour an Agent follows |
| **Prompt Blocks** | Reusable prompt fragments |
| **Nodes** | Your own integrations, and a place to run them |
Everything is a file in your repository. Studio renders what is there, and saving a file
updates what you see.
## Check your work
Studio validates as you go, and it will not let a broken definition be published.
## Run a node for real
The **Nodes** tab runs a node against the real service, with no platform running. Fill in
the settings, press **Run**, and the output appears beside them.
Keys come from your own `.env` and are stored nowhere.
[Testing Nodes](/nodes/testing-nodes) covers it.
## Publish to a universe
Everything up to here is offline. No account, no network, no universe. Connecting is the
one place Studio asks you for anything.
**Connect.** Type the address of the universe you are publishing to. Studio asks that
universe who authenticates it and signs you in against whatever the answer is, so it names
no provider and assumes nothing about how your organisation logs in.
You can keep more than one, and switch between them.
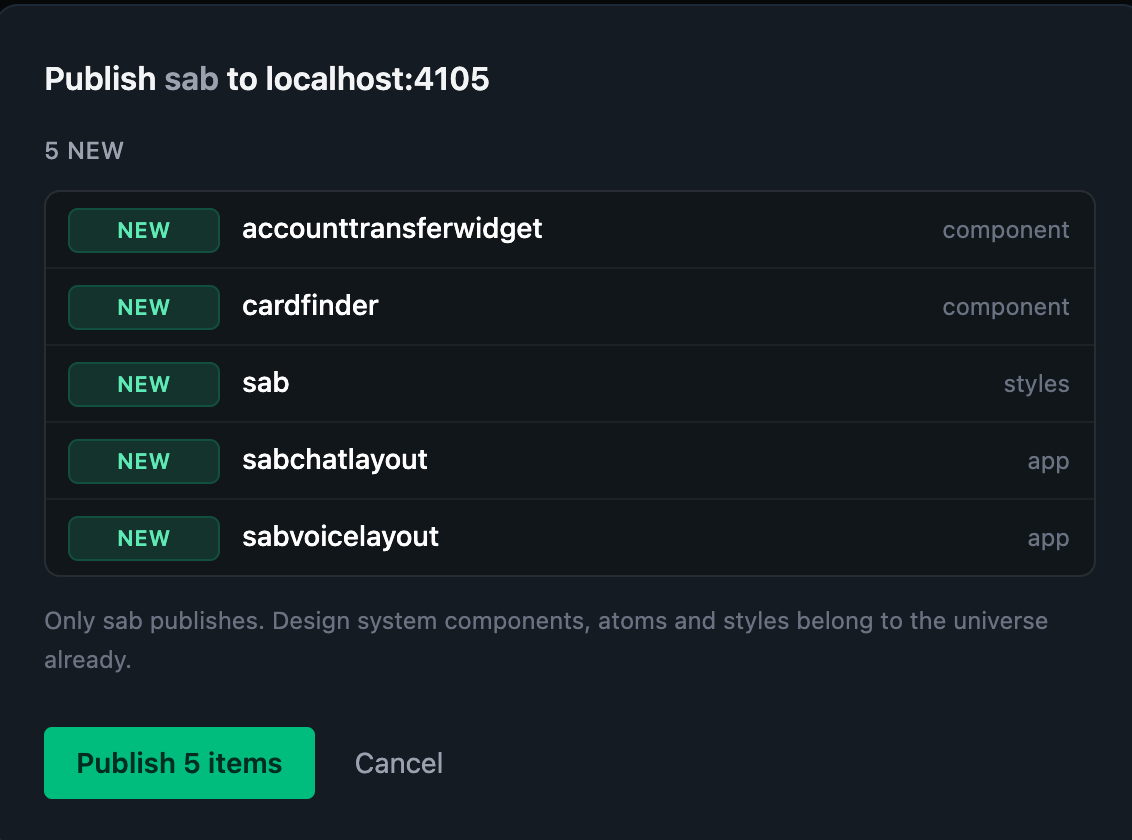
 **Publish.** Studio checks your work first: if a rule fails, the publish is blocked and you
see the problem here rather than as an error from a server. Then it shows you a plan of what
would be created and what would change, and nothing is sent until you confirm.
**Publish.** Studio checks your work first: if a rule fails, the publish is blocked and you
see the problem here rather than as an error from a server. Then it shows you a plan of what
would be created and what would change, and nothing is sent until you confirm.
 **A node then waits to be accepted**, because it is the only thing you publish that holds a
URL and a key. Whoever runs the universe sees the hosts it wants to call and the credentials
it needs before it can run. After that first acceptance you publish freely, and it only
pauses again if the node reaches for something new.
Publishing needs permission on your account, and it is a specific one. Being able to build a
workflow does not carry it, because pushing a node the whole universe can use is a different
power. If you do not have it, whoever runs the universe grants it.
## Set up your editor
Everything you author is validated against a schema **as you type**, so a typo or an unknown
field is underlined rather than surfacing later.
This works for `.json` out of the box. YAML needs one extension:
| Extension | ID | Install from |
| --------- | -------------------- | ------------------------------------------------------------------------------------------------------------------------------------------------------------- |
| **YAML** | `redhat.vscode-yaml` | [VS Code Marketplace](https://marketplace.visualstudio.com/items?itemName=redhat.vscode-yaml) · [Open VSX](https://open-vsx.org/extension/redhat/vscode-yaml) |
Install it from your editor's extensions panel, or the links above. It is the same
extension everywhere: VS Code installs it from the Marketplace; Cursor and Windsurf
install it from Open VSX.
Without the extension, YAML files get **no validation at all**. Nothing warns you: they simply stop being checked. If you skipped the prompt, search for `redhat.vscode-yaml` in your editor's extensions panel.
Each file you author carries a `$schema` line, which is what the extension follows. To
confirm it works, open a node's `node.yaml` and delete a required field such as `type`. A red
underline should appear within a second. Undo, and it clears.
## Next steps
Build an integration as four small YAML files.
Design the interfaces your Agents speak through.
Run a universe yourself: Docker, database, images.
**A node then waits to be accepted**, because it is the only thing you publish that holds a
URL and a key. Whoever runs the universe sees the hosts it wants to call and the credentials
it needs before it can run. After that first acceptance you publish freely, and it only
pauses again if the node reaches for something new.
Publishing needs permission on your account, and it is a specific one. Being able to build a
workflow does not carry it, because pushing a node the whole universe can use is a different
power. If you do not have it, whoever runs the universe grants it.
## Set up your editor
Everything you author is validated against a schema **as you type**, so a typo or an unknown
field is underlined rather than surfacing later.
This works for `.json` out of the box. YAML needs one extension:
| Extension | ID | Install from |
| --------- | -------------------- | ------------------------------------------------------------------------------------------------------------------------------------------------------------- |
| **YAML** | `redhat.vscode-yaml` | [VS Code Marketplace](https://marketplace.visualstudio.com/items?itemName=redhat.vscode-yaml) · [Open VSX](https://open-vsx.org/extension/redhat/vscode-yaml) |
Install it from your editor's extensions panel, or the links above. It is the same
extension everywhere: VS Code installs it from the Marketplace; Cursor and Windsurf
install it from Open VSX.
Without the extension, YAML files get **no validation at all**. Nothing warns you: they simply stop being checked. If you skipped the prompt, search for `redhat.vscode-yaml` in your editor's extensions panel.
Each file you author carries a `$schema` line, which is what the extension follows. To
confirm it works, open a node's `node.yaml` and delete a required field such as `type`. A red
underline should appear within a second. Undo, and it clears.
## Next steps
Build an integration as four small YAML files.
Design the interfaces your Agents speak through.
Run a universe yourself: Docker, database, images.